How to (Legally) Make Your Own Off-the-Books Handgun
Build a Glock 17 using parts from the internet
This article is part of Reason's special Burn After Reading issue, where we offer how-tos, personal stories, and guides for all kinds of activities that can and do happen at the borders of legally permissible behavior. Subscribe Now to get future issues of Reason magazine delivered to your mailbox!
Let's start with a disclaimer: If you have little to no experience with guns, it's probably not wise to try assembling your own. It can be dangerous to make a mistake—even deadly. There's no shame in buying a firearm from a reputable manufacturer and then taking a class to learn how to handle it safely, defensively, and intelligently.
But do-it-yourself has its appeal as well. For those who already have basic firearm know-how and competence with common tools, it's easy to make a gun that's just as safe as one bought from a store.
It's also perfectly legal in most American jurisdictions. That simple fact tends to be ignored by pundits and politicians in the debate over gun control. But if even moderately skilled people can create their own weapons at home—and increasingly they can—then passing laws to regulate commercial manufacture and sale starts to look awfully futile. While firearm restrictionists will likely soon be clamoring for laws to rein in private production, there's only so much they can do: Communicating instructions for how to build a gun is constitutionally protected speech, after all.
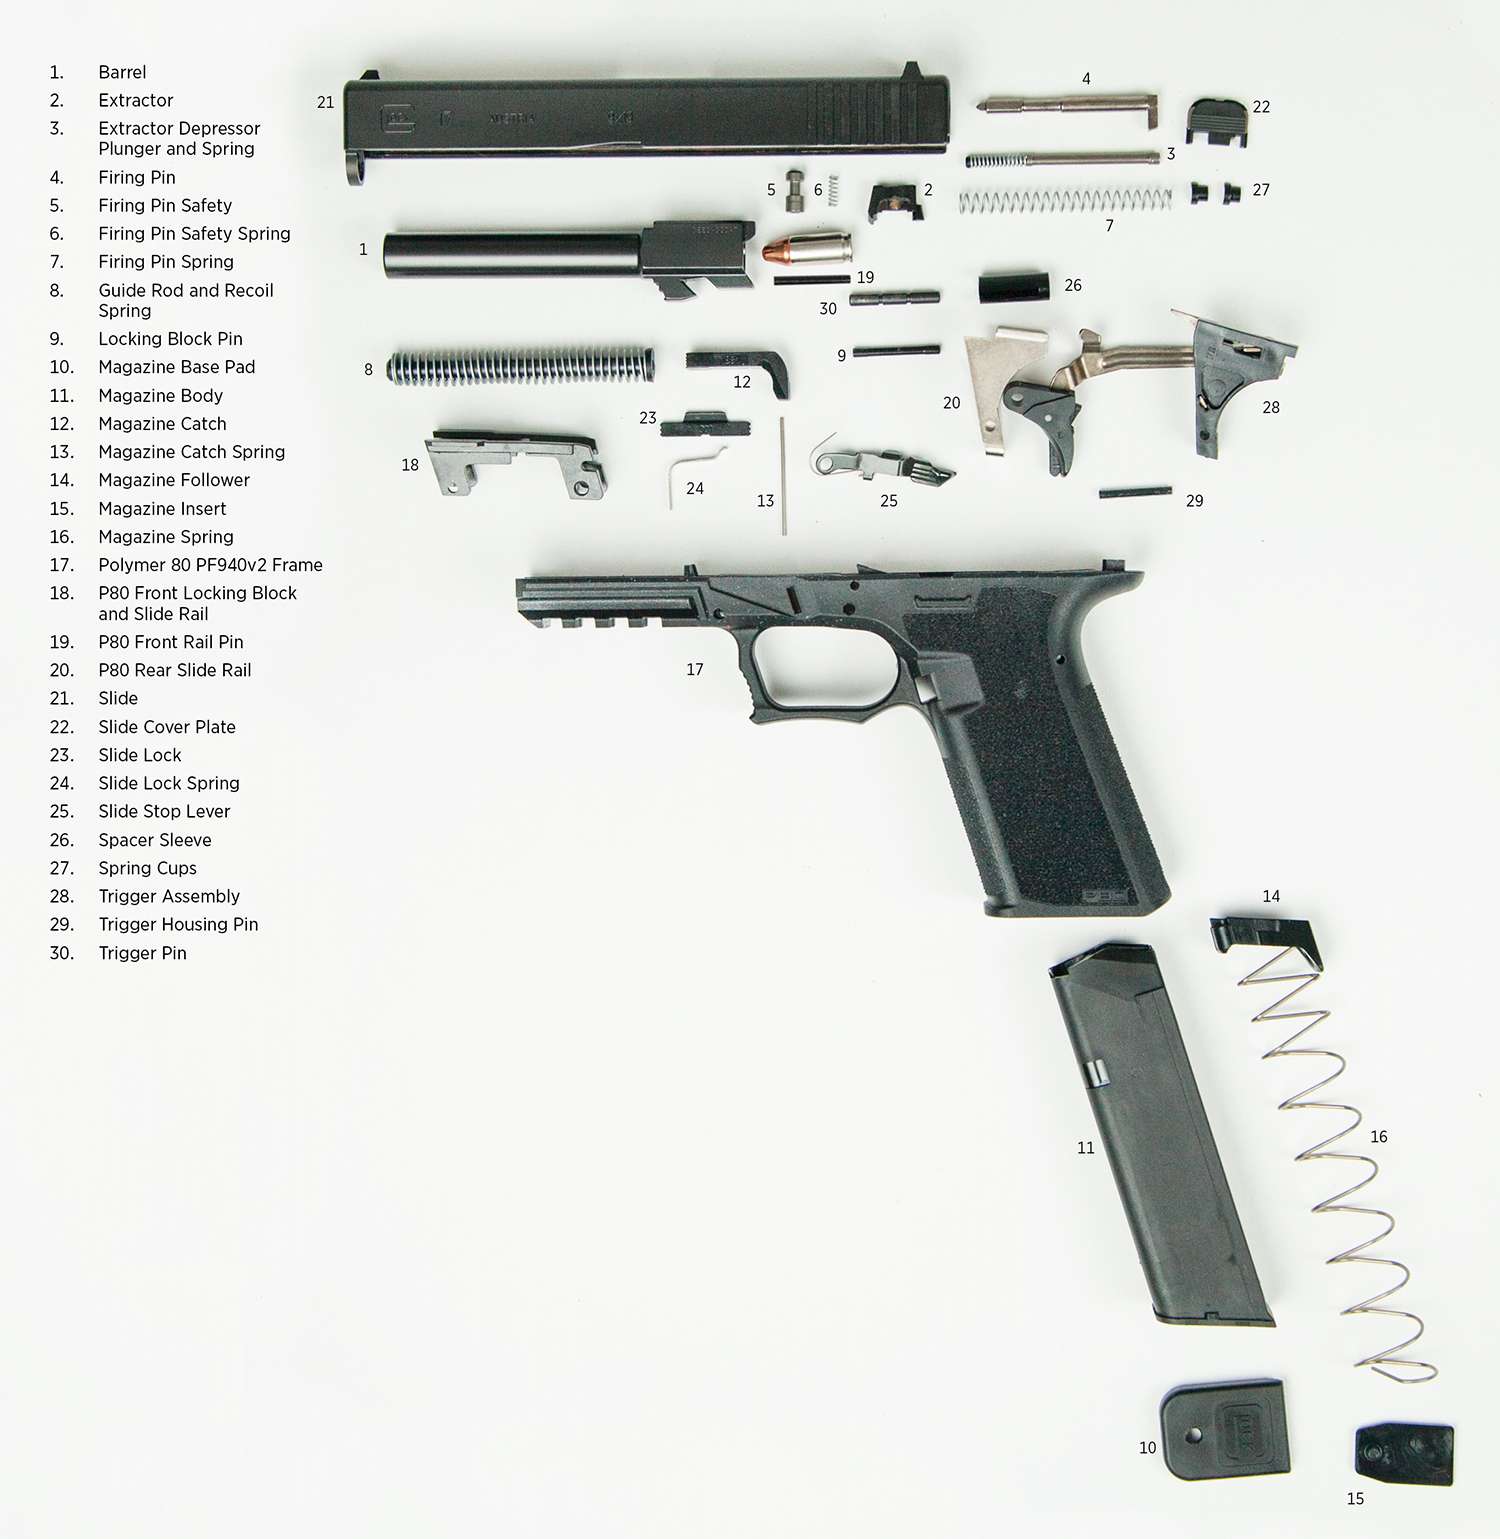
In celebration of the First Amendment, let's walk through how to make a weapon based on one of the most popular semi-automatic handguns in the world: the Glock 17, a full-size double-stack 9 mm pistol with a track record of reliability and simplicity. Recently, third-party companies began marketing "frame kits" that allow private individuals to make guns that look and operate like Glocks and are compatible with Glock parts. There's a caveat, however: Their product includes excess plastic that, unless removed, prevents you from turning it into a functional weapon. By itself, the object they sell doesn't count as a firearm in the eyes of the law. Instead, it is colloquially known as an "80 percent frame" or an "80 percent receiver."
This will be the platform for our homemade gun.
How Is This Legal?
Guns are regulated in various ways. The same is not true for an object that happens to be transformable into a gun by a skilled home hobbyist.
Despite the name, though, the difference between a gun and such an unregulated object isn't as clear-cut as some sort of "80 percent rule," says attorney Mark Barnes, a D.C. lawyer who specializes in issues involving the import, export, and manufacture of firearms. "The fact of the matter is that firearms design differs from gun to gun. As a consequence, the final judge on whether or not a physical object constitutes the frame or receiver of a firearm is the Firearms and Ammunition Technology Division of the Bureau of Alcohol, Tobacco, Firearms, and Explosives" (ATF).
If you send ATF an object, the bureau's experts will explain why it is or isn't a firearm according to two main laws. The Gun Control Act of 1968 defines a firearm as "any weapon…which will or is designed to or may readily be converted to expel a projectile by the action of an explosive," or "the frame or receiver of any such weapon." The National Firearms Act, meanwhile, says the frame/receiver is the "part of a firearm which provides housing for the hammer, bolt or breechblock and firing mechanism, and which is usually threaded at its forward portion to receive the barrel."
Eighty percent receivers are incapable, out of the box, of accepting a slide or trigger assembly. Turning one into a working gun takes some amount of drilling, filing, or millwork. As a result, ATF does not consider them to be firearms, and they can be bought outside the bureaucratic system that governs firearm sales.
Federal law demands that all commercial firearm purchases go through a registered Federal Firearms License (FFL) holder. Guns produced and sold by FFLs must be stamped with serial numbers, and the dealer must keep records of all sales.
Those restrictions apply to commercial transactions. But private individuals are allowed to make their own guns, Barnes explains, "as long as they aren't prohibited under federal, state, or local law from accessing, transporting, or receiving firearms." If you are not a licensed dealer, in other words, you can most likely purchase an 80 percent frame, remove the excess material, add a few parts, and turn it into a functional gun. No questions asked, no government paperwork, no background checks.
This is where the 80 percent Glock models shine. The frame kit and all other necessary parts can be legally ordered on the internet. Because the frame is made of polymer, hand tools will be enough to get the job done. You don't need an expensive computer numerical control mill or drill press—just a Dremel or similar automatic rotary device, a set of files, and some sandpaper.
After having their designs reviewed by ATF, companies such as Polymer80 and Lone Wolf released some of the first unfinished frames for the full-size Glock 17 and compact Glock 19. Typically, their designs include a few improvements over stock Glock frames, including a different grip angle, texture, and attachment system. For our build, we went with a Polymer80 PF940v2 purchased from Brownells.com. We also bought a complete Gen 3 Glock 17 slide and barrel assembly and a Glock lower parts kit (including trigger assembly) on eBay.
Who Might Want To Do This?
Gun sales typically soar when people have reason to fear that laws governing who can legally obtain different types of weapons are about to get more stringent. Following the Valentine's Day school shooting in South Florida, there was an uptick in anti-gun rhetoric. Firearm sales the following month broke the previous March record by a quarter-million.
And those are only the sales tracked through the FBI's National Criminal Background Check System. As worries over potential bans or even confiscations rise, some feel the urge to leave as small a paper trail as possible regarding their personal weapons.
The easiest way to avoid government attention is to purchase your gun from a private seller. Most states minimally regulate such transactions, leaving Americans free to buy firearms from each other without much interference. But a secondary-market weapon is still marked with a serial number that can be traced back to the original owner, which means there is a path eventually leading to you.
If paper trails are your biggest worry, you may be thinking of grinding the serial number off a gun you purchase. This is a felony. Do not do this.
A better way to fly under the radar is to make the gun yourself. Firearms produced by individuals outside the FFL system don't require a serial number under federal law.
(Note that states may nonetheless require one. For example, California in 2017 mandated that all "ghost guns," or guns made by nontraditional manufacturers, be registered and have a serial number added to them. This will probably be hard to enforce. Still, you should be sure you know what laws are on the books in your state before going down this road.)
To remain anonymous, you'll need to buy the unfinished frame and other parts with cash. It's doable, but it's likely to be a pain in the ass. Instead, most people shop online.
The internet has ushered in a golden age for small arms. It's easier than ever to learn about guns, purchase parts, and find places to train to use your weapon. If you want to know it or buy it, it's out there, thanks to the web. It's actually slightly more expensive to acquire the unfinished frame and parts to assemble a Glock yourself than it is to purchase one readymade, but everything you need is available at your fingertips.
The downside of credit cards and shipping addresses is that there will be a record in some form of what you buy. In the event of a ban (or if law enforcement has some reason to take an interest in you), the receipts can be subpoenaed.
Nothing is totally foolproof, but adding an extra layer of complexity to slow attempts by outsiders to locate your weapons might be worth it to you. For this experiment, we purchased all our parts on the internet. They were shipped directly to us, with no FFL middleman and no government registration.
Your home-crafted gun may not work as well as a factory Glock—though, with care and some modifications, it could work even better—but if you value privacy over price and don't mind a bit of tinkering, this could be a solution for you.
How To Finish the Frame and Assemble the Gun
To finish your gun from 80 percent, you'll need to remove the excess polymer that prevents the slide and trigger assembly from being attached. (The slide we used came already assembled, as did the trigger assembly.)
The frame is shipped with a jig—a device that holds the object you are working on and guides the tools you're using on it—that helps with sanding and drilling. Extending above the jig are the parts of the frame we'll be sanding off—we'll call them "tabs"—which are labeled on the jig with the word "remove." Most unfinished polymer frames are finished in a similar manner. Consult the instructions if you choose another model.
I am not, nor is anyone at Reason, a professional armorer or gunsmith—just an interested amateur who used the following techniques to make a usable weapon at home.
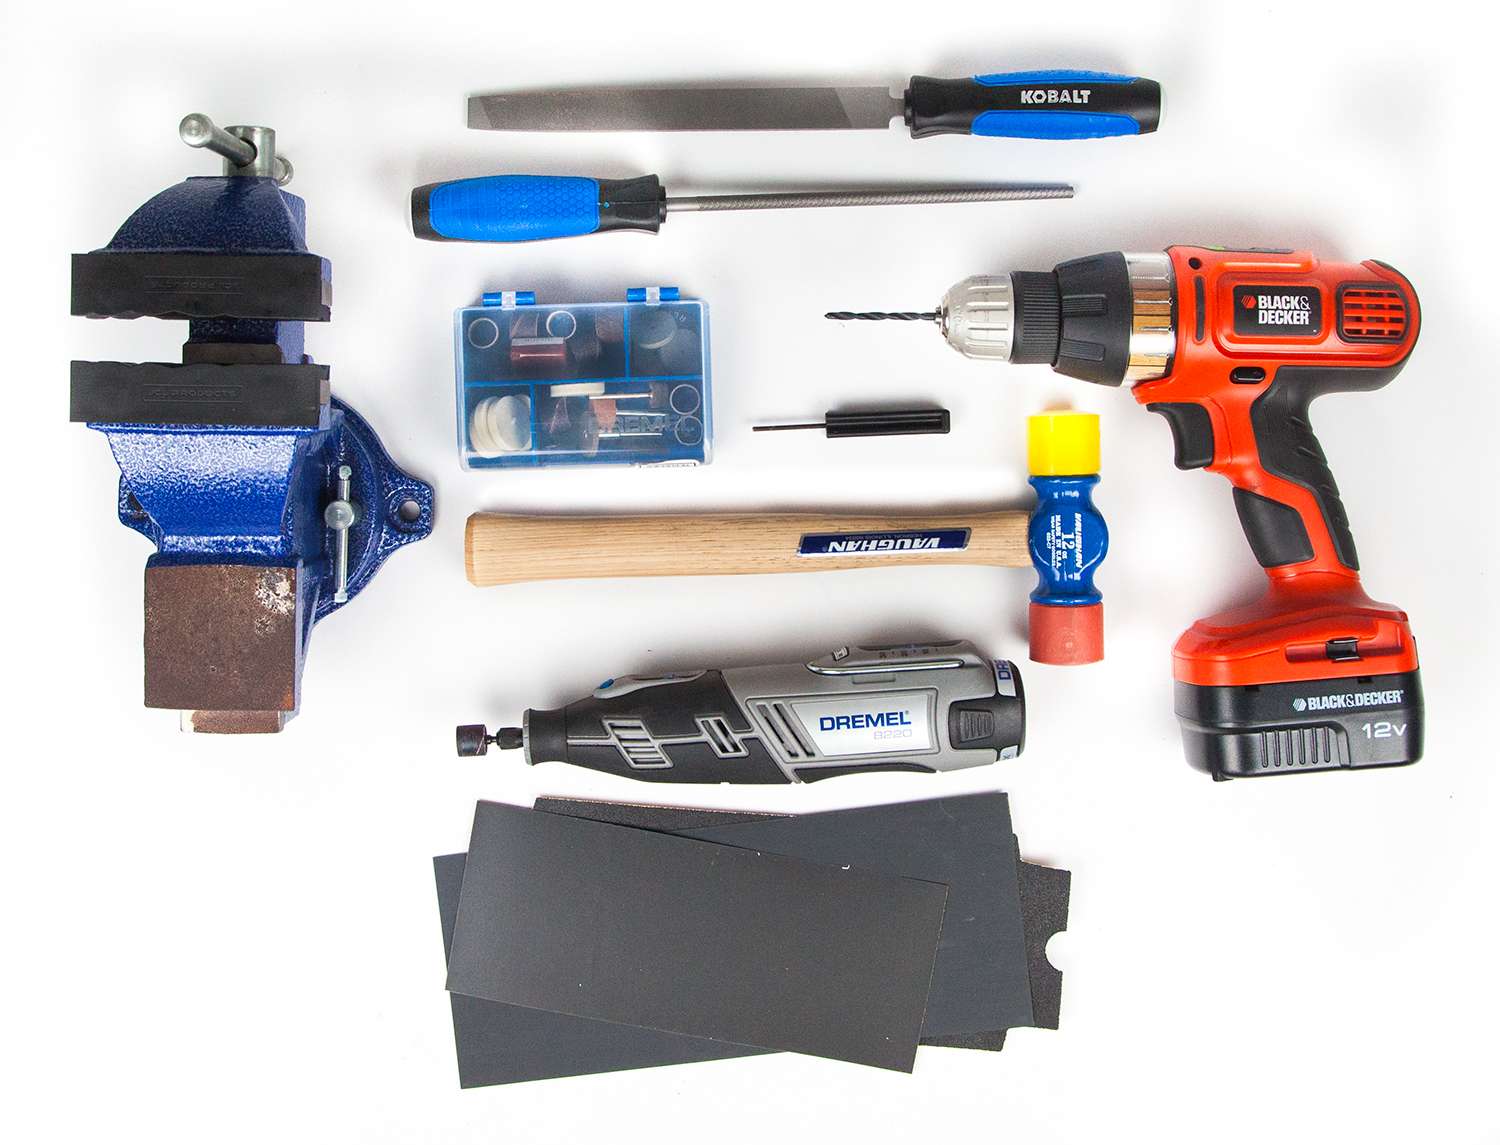
TOOLS YOU WILL NEED:
- A Dremel or other rotary tool with a sanding drum
- A set of metal files
- Coarse and fine-grit sandpaper (we used 100-, 800-, and 1,200-grit)
- WD-40 and a firearm lubricant such as RemOil or Ballistol
- A hammer (preferably nylon, rather than metal, so as not to mar the frame)
- A flathead screwdriver
- A bench vise (optional but helpful)
- A power drill (optional; your rotary tool may be substituted)
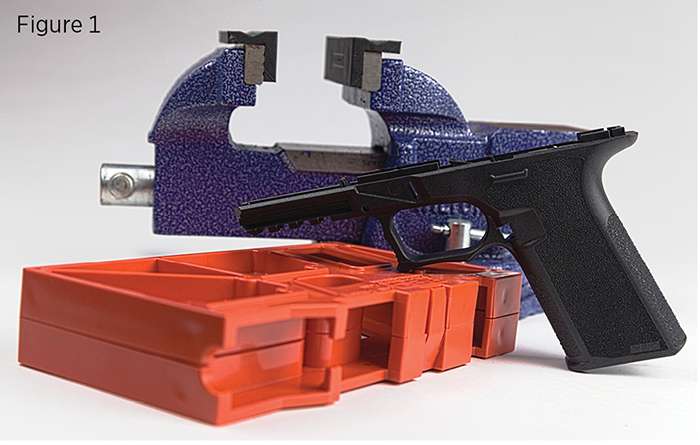
Assemble the needed supplies (Figure 1). Using a vise, secure the frame in the jig and make sure it is level. Optionally, tape the ends of the jig to ensure minimal movement of the frame.
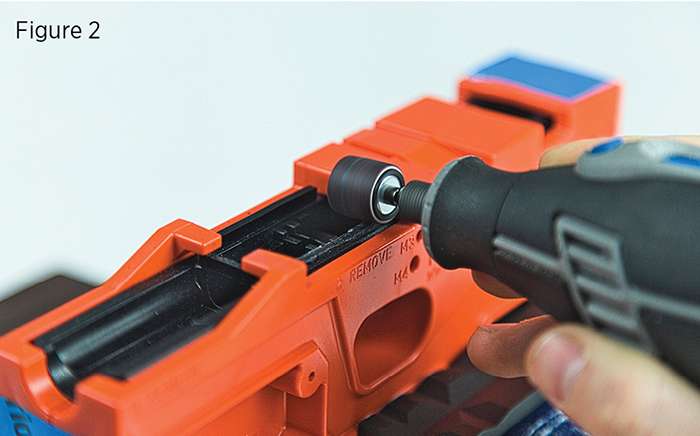
Using the Dremel and the sanding drum attachment, start to sand down the polymer tabs marked for removal (Figure 2). Be very careful. While you can use the Dremel for the entire process, it is much easier to make a mistake that way. Use the Dremel for most of the heavy lifting. In the next step, you'll continue the sanding by hand for a more precise and smooth result.
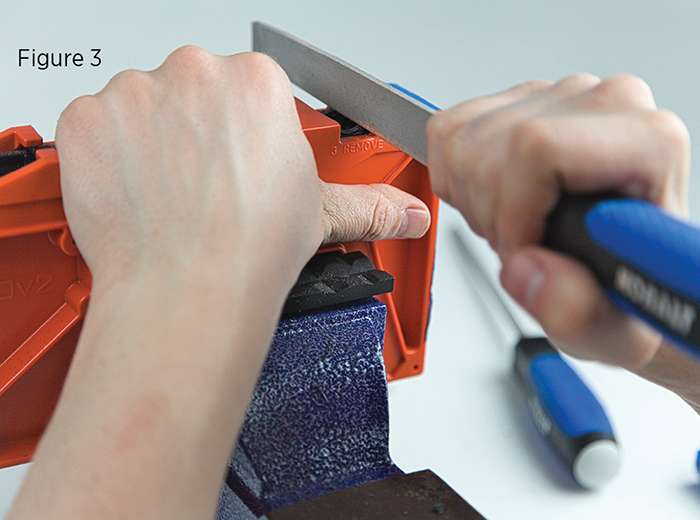
Once the majority of the material has been removed from all four tabs, use hand files to smooth the remaining material (Figure 3). Be sure not to go too far into the frame. The files should be used to remove the material in the corners that the sanding drum can't reach.
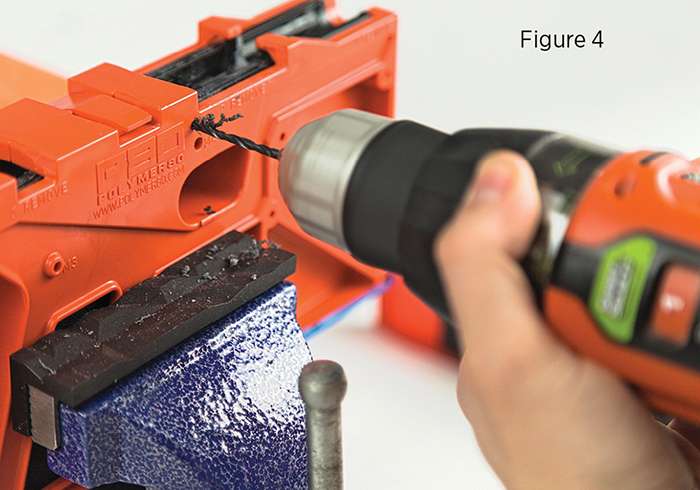
While the frame is still in the jig, drill the holes for the trigger assembly and rear slide rails (Figure 4). The exact placement and drill-bit sizes for these holes are marked on the jig. Use the supplied drill bits in either a hand drill or the Dremel for this step. It is important that you take your time, making sure to drill a perfectly straight hole.
When drilling, do not go through the entire frame from one side. Instead, alternate drilling on each side until you feel the drill bit break through the polymer. Use a sharp blade or a small file to clean up the holes on the inside of the frame.
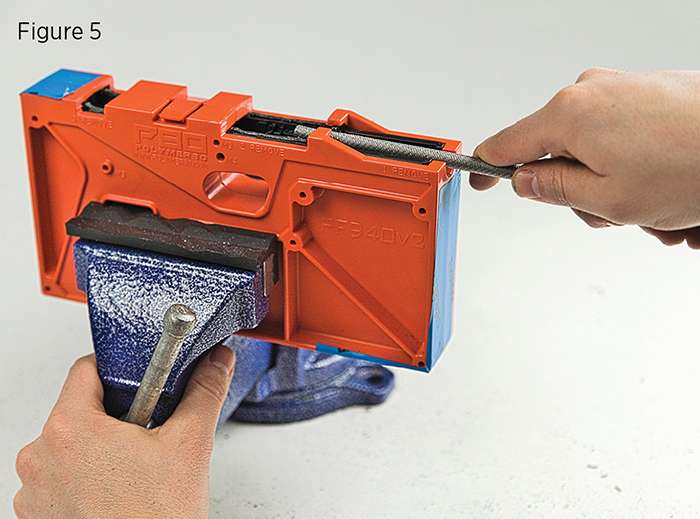
Using the Dremel or a round file, remove the excess polymer from the guide rod channel (Figure 5). There's a U-shaped mark on the polymer indicating which section is to be removed. Like before, be cautious and take your time.
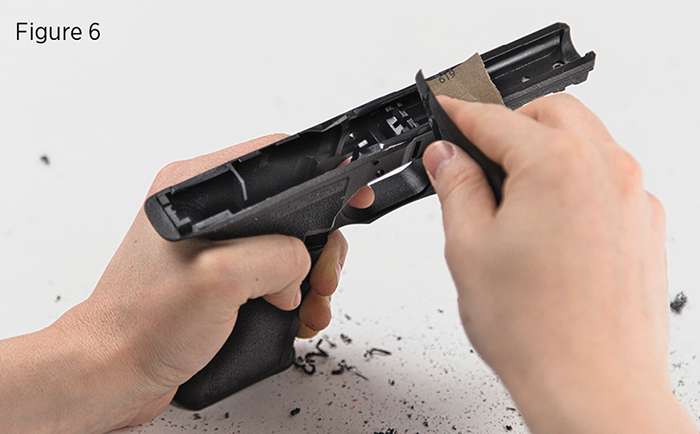
After drilling the holes for the trigger assembly, you can begin the final round of sanding (Figure 6). Start by spraying a small amount of WD-40 on coarse-grit sandpaper for a wet-sand effect. Going slowly to make sure you don't bite into the frame, sand off any polymer that remains where the tabs were, cleaning up the plastic burrs that may still be attached to the frame. Once the tabs are totally flush with the rest of the frame, use the fine-grit sandpaper with WD-40 for a polished effect.
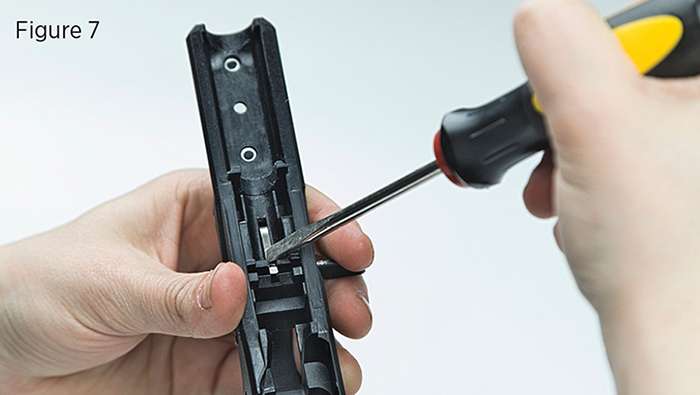
Now you're ready to start assembling the frame. Install the slide lock by inserting the slide lock spring into the top of the frame. Using a flathead screwdriver, depress the spring and push the slide lock into the channel on the side of the frame above the spring (Figure 7). The small lip on the slide lock should face toward the rear of the frame.
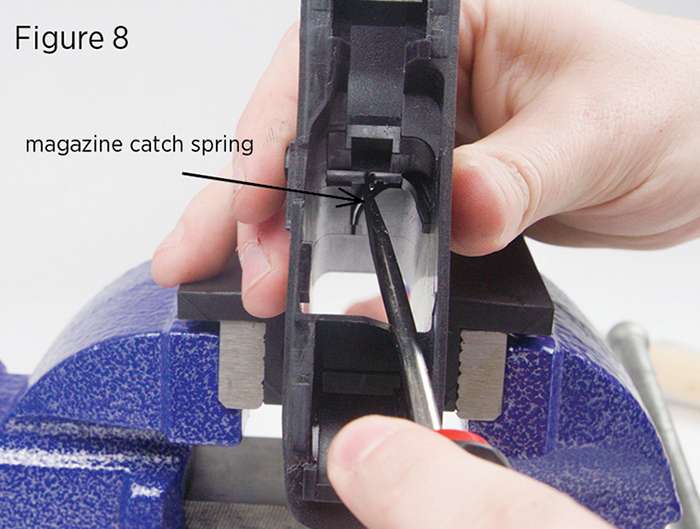
To install the magazine catch, insert the magazine catch spring through the top of the frame and into the channel at the font of the magwell (i.e., the hollow space inside the grip that will accept the magazine). Push the magazine catch in through the side of the frame. With your flathead screwdriver, pull the top of the magazine catch spring away from the frame, allowing the magazine catch to slide underneath. Use the screwdriver to guide the magazine catch spring into the slot on the magazine release (Figure 8).
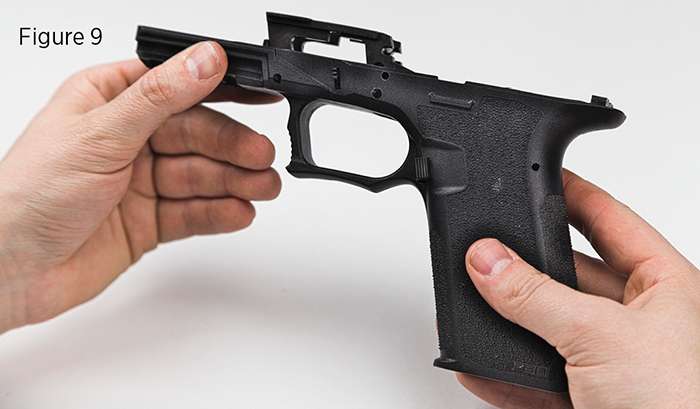
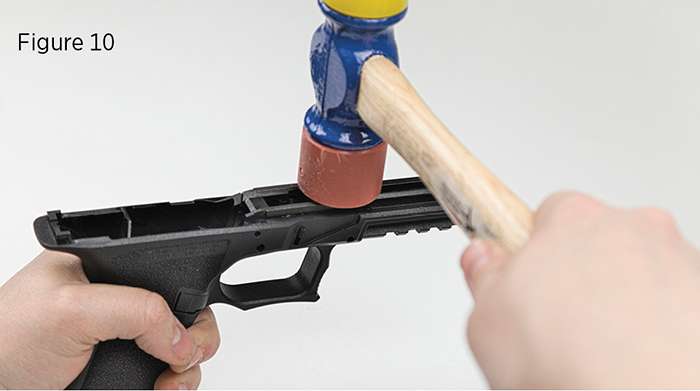
Insert the front and rear slide rails into the frame (Figure 9). Using a hammer, tap them into place (Figure 10).
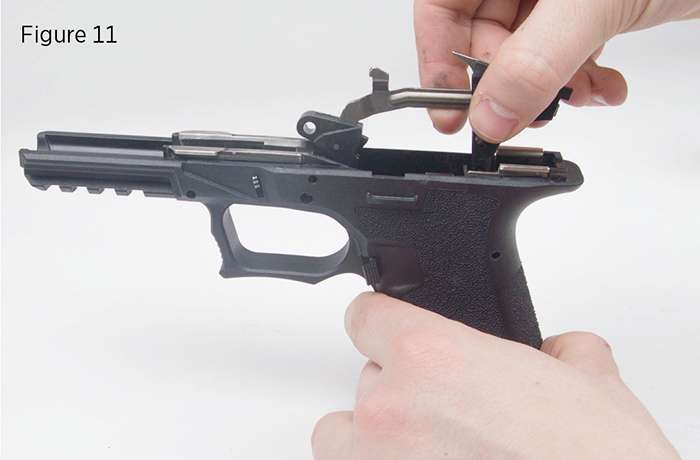
Insert the trigger assembly into the rear of the frame (Figure 11).
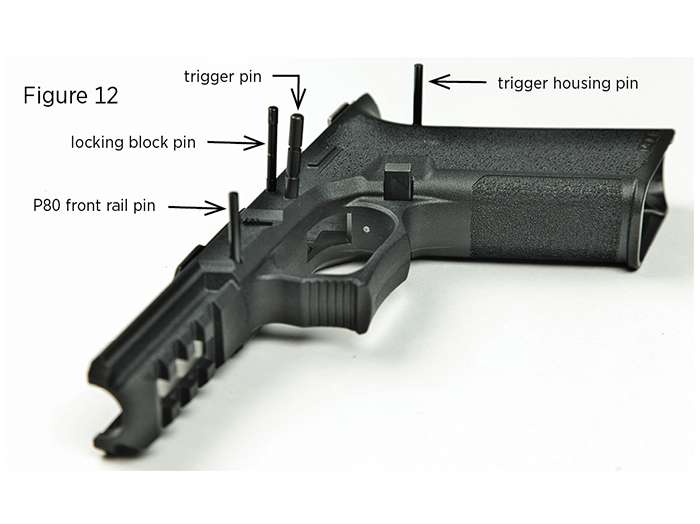
Using a hammer, drive in the trigger housing pin, the P80 front rail pin, and the locking block pin (Figure 12).
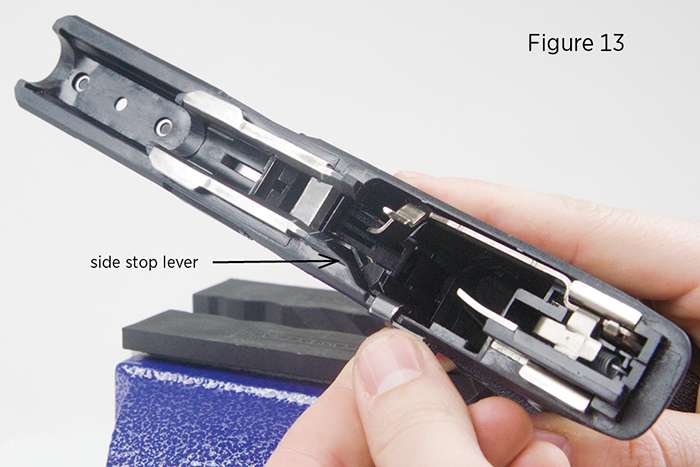
Insert the slide stop lever. The U-shaped spring should rest underneath the locking block pin, and the hole should line up with the trigger pin hole (Figure 13). Drive in the trigger pin.
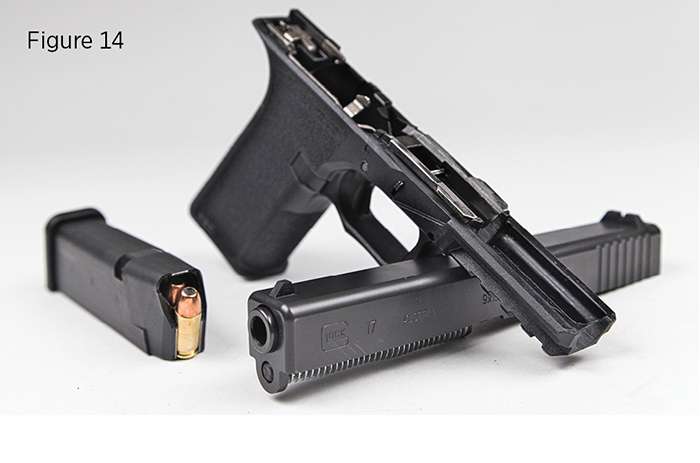
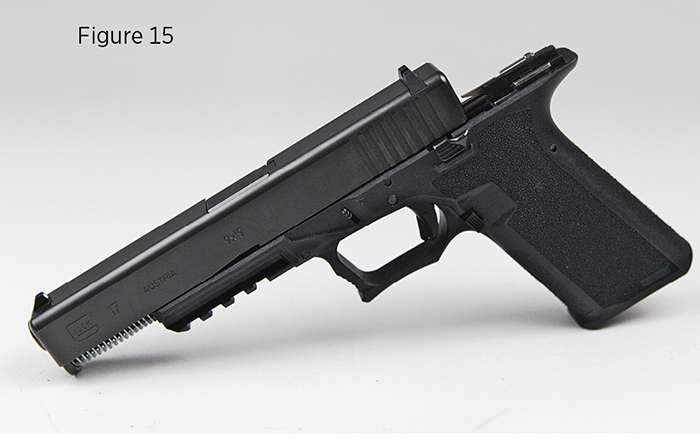
The frame is ready to accept a slide assembly (Figure 14). Lubricate the rails and attach the slide to them (Figure 15). They may need some additional polishing or filing to allow the slide to move freely.
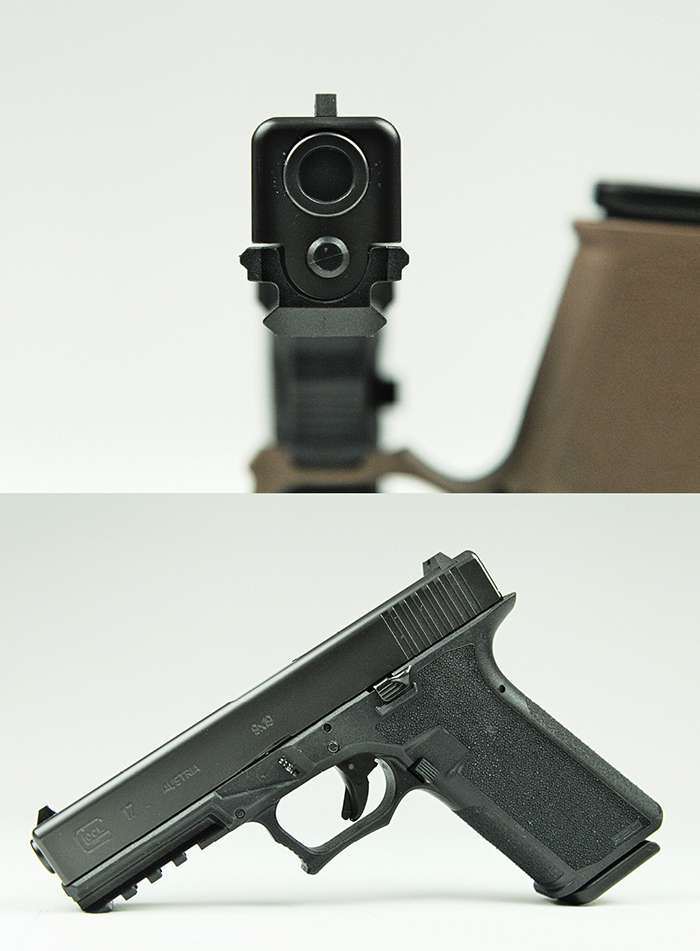
Inspect the frame and slide, ensuring everything functions properly before firing, as you would with any new firearm.
Congrats! You're now the owner of an off-the-books handgun.
This article is part of Reason's special Burn After Reading issue, where we offer how-tos, personal stories, and guides for all kinds of activities that can and do happen at the borders of legally permissible behavior.
This article originally appeared in print under the headline "How to (Legally) Make Your Own Off-the-Books Handgun."


Show Comments (69)